Why would you do this?
Normally, to access Amazon Web Services (AWS) from the command line (AWS CLI), SDKs, or the AWS CDK you would (according to the docs) store your AWS IAM user account credentials in ~/.aws/credentials. This is convenient, and allows you to store credentials for many IAM user accounts as “profiles”. If you are like we are, you have many different IAM users, and thus many different AWS access keys.
The flip side of this convenience coin (because everyone knows that convenience is inversely proportional to security) is that now I have access to those accounts via a plain-text file on my hard drive. Of course, I have taken every other type of precaution to ensure this hard drive is encrypted at least once, password protected, and physically soldered to the motherboard of this machine. But sometimes, sometimes, that’s just not enough.

Why 1Password
I personally use 1Password as my password management utility. There are many options, but 1Password works natively with all the devices I use, and I can share password vaults with either family members or coworkers.
You will need 1Password 8 or later. This version includes connectivity to a command-line (cli) utility called op.
In the documentation (here) and the relevant blog post, they outline how to use op with the AWS cli. Specifically, they suggest that you use an alias to the aws command, using the op run capability.
The problem with an alias is that it only covers that one vector into AWS from the command line: the aws command. It doesn’t cover any tools that use any of the AWS SDKs, AWS CDK, aws sam, AWS Amplify CLI, etc.
The solution I propose here will support all of those.
The Mechanism
Instead of aliasing the aws command, we’ll use the normal AWS configuration process, namely the ~/.aws/credentials file. Specifically, we’ll use the credential_process mechanism to handle access management from 1Password.
First, place the file op-cred-helper.sh (below) into your ~/.aws/ folder, after reading it first. It’s small, and you always want to make sure you know what you’re installing. (Sorry, I don’t have a Windows equivalent, but it shouldn’t be too hard to make.)
#!/bin/bash

vault="$1"
secret_id="$2"

cat <<END | op inject
{
  "Version": 1,
  "AccessKeyId": "{{ op://${vault}/${secret_id}/aws_access_key_id }}",
  "SecretAccessKey": "{{ op://${vault}/${secret_id}/aws_secret_access_key }}"
}
END
Then make it executable. On macOS/Linux that’s:
chmod +x ~/.aws/op-cred-helper.shThen, for the credentials, you’ll use something like this:
[ten-mile-square-test-profile]
region = us-east-1
credential_process = "/Users/rob/.aws/op-cred-helper.sh" "VAULT_NAME" "ten-mile-square-test-creds"
Notes:
ten-mile-square-test-profile– that’s what’s used inAWS_PROFILEor--profile– you will want to change it 😀/Users/rob/– the file will not be interpreted, so you can’t use~or$HOME, etc. You have to put the full path in. It’s okay, we’re NOT sharing this file. (Right? Say it. “We’re not sharing this credentials file.” Good.)VAULT_NAME– change this to the name of your vault. Using vaults in this way is great, since you can separate personal from business, and client from client, etc.ten-mile-square-test-creds– this is the name or ID of the “secret” in 1Password. This is just a normal account entry in 1Password. I use the same one I use in the browser for autofill login at the AWS console. If the name has anything but letters and-and_and spaces, you’ll want to use the ID. Grab that with:op item list --vault | grep "item name here"
1Password-side Setup
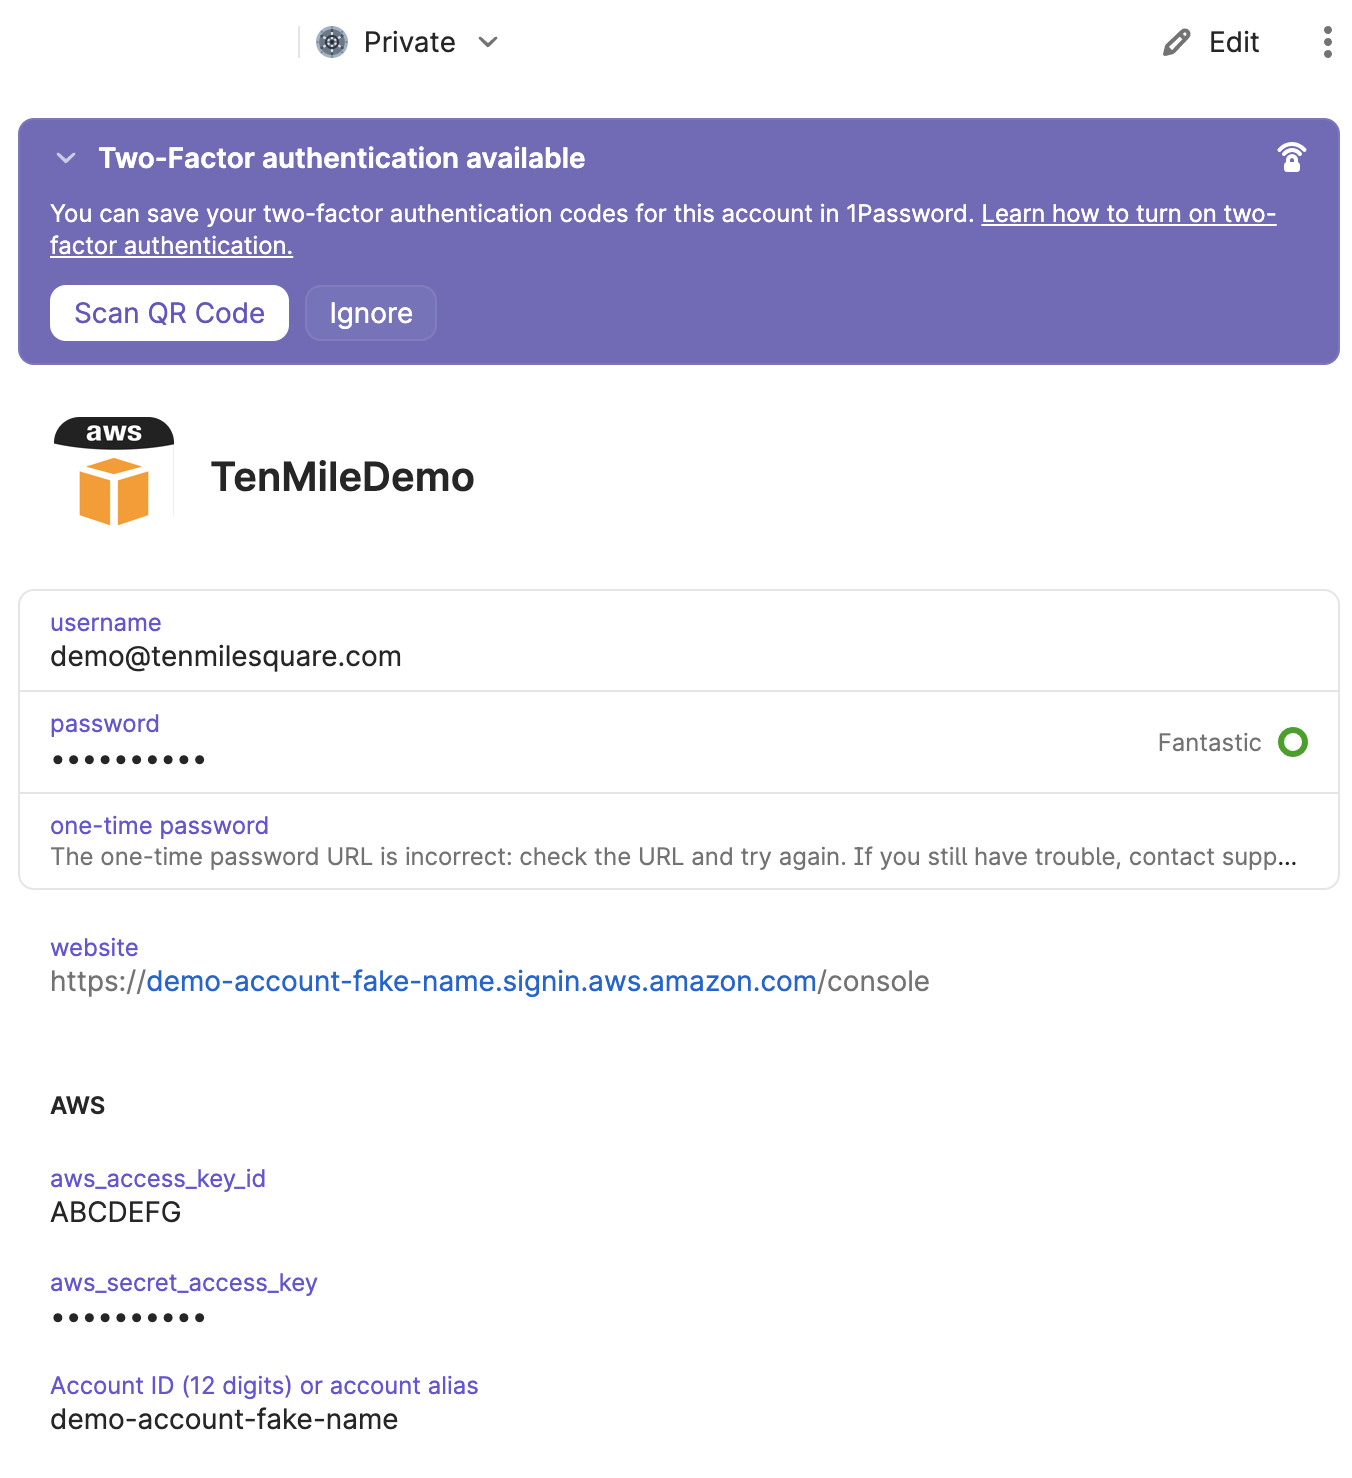
In your 1Password login named ten-mile-square-test-creds (or whatever you used), you’ll want to add a section called AWS, and two entries: a text field aws_access_key_id and a “password” field (so it won’t accidentally show the contents during a screen share) named aws_secret_access_key. They should contain the respective values that you would have put directly in the ~/.aws/credentials file before. See the example:

Don’t forget to setup that Two-Factor Authentication!
Done!
Now, when you try to run a command with the CLI, or that uses the AWS credentials, it will run that helper script, and call op, which will need the vault unlocked. If it’s not unlocked, it’ll use the normal methods to unlock it, such as biometrics (Touch-ID, Face-ID, etc.) or to ask for the vault master password.

